Sunday, December 27, 2015

Happy Holidays and Have a Wonderful New Year!

Internal Dialogue (dramatization):
Self #1: So...we really need to focus now on doing this paperwork and cleaning...
Self #2: Let's make a unicorn! [bounces and nods]
Self #1: [sigh.]

Usually, I take the week between Christmas and New Years off to clean and organize the house and studio, etc., but this year, it turned out that the best time to work on the studio and take an art-pause was in the days leading up to Christmas.

Instead of arting, I baked cookies for my friends and family (ginger kitties and kitty toys - or as some people like to call them "ornaments," and dark chocolate peppermint bark - 2 layers of chocolate, made sans double boiler without letting the top layer melt through the bottom and a lot of crushed candy canes - gold star!). I had some excellent help wrapping packages and generally spent quality time with my feline assistants.


getting a kite in the air - Dad has skills!


Then I got to have a wonderful visit with some of my family :)

success!

sand angel


I love my family and friends - kind, talented, and generous souls.

Even away from the studio though, it's like my work is a holographic screen that overlays everything I see. While I was on the road, I got to thinking (uh oh...)


The content of my work is pretty stable - plants, animals, archetypal figures, patterns, drapery, construction machinery/ vehicles, but the approach has gradually changed through the years.  I see two trends:


The work is becoming 1) more subtractive 2) the "original" is becoming more diffuse.

painting (additive - one piece)
drawing (additive - one piece )
collage of drawing (additive - multiple pieces)
printmaking (subtractive - one piece)
printmaking collage (subtractive - multiple pieces)


What I mean by "becoming more diffuse" is that it's both quantitatively and qualitatively more pieces:

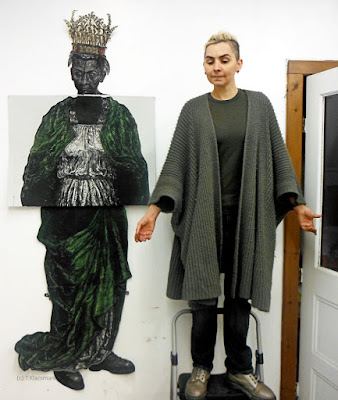
For the collage of the full-scale figure, there are (*I think) 34 blocks/plates:

1 crown
1 head
1 neck and patterned fabric
6 torso
4 abdomen
2 dress sleeves
2 patterned sleeves
2 hands
8 skirt
3 outer drapery fold
2 patterned bottom of dress
2 shoes

And qualitatively, the idea of "the original" is spread across the physical and digital. One thing about making this figure was that it required a lot of digital work. While there is still a physical relief block associated with each element, the final part for some of the pieces went through the computer as the intermediary (sometimes more than once;for example, with the patterned fabric - there was an additional round of scanning and file preparation). I made a flow chart for a typical piece: :)

..and it's over 40 files so...repeat, repeat, repeat...

I'm of two minds about this. On the one hand, mostly, I'm extremely excited to have a process that leads to a desired result, and I can't stop thinking of all the things I could make with it - unicorns, tress, winged tigers...) To me, it's an interesting thing - to examine 15th and 16th century printmaking, works that were created during a period when the social and economic systems that supported them were collapsing, and show how/ make it relevant. I think its still got the magic, and trying to preserve that spark and translate it into contemporary material/ techniques is an interesting challenge. On the other hand, this is not exactly an efficient process - it absorbs resources, and that's a reality I can't ignore or escape.

And then there's the other thought that keeps coming back...I can't stop thinking that it's not complete yet, or that only one aspect is - I've been thinking that as the idea of the "original" becomes more diffuse, the outcome should too.  That there should be a physical outcome (the finished collage piece), but also a digital outcome that is designed to maximize the potential of that medium (i.e. digitally photographing and posting the physical outcome is not it (yet - oy.)) I keep wanting to see these move, for them to have sound...

This makes my practical side very, very nervous.

Internal Dialogue (dramatization)
Self #1: It took all the skill we have to get it to this point, and it's not generating revenue (to put it mildly),and now, you want to also make animation?!? [Cries in frustration.]
Self #2 [Pets Self #1's metaphorical head - pet, pet] It's ok - you can thank me later :).

Haha - on that note, Happy Holidays and a Happy New Year! Cheers to a 2016 filled with much beauty, art and joy!

Saturday, December 19, 2015

the big reveal for WSW!

As installed on my last day at Women's Studio Workshop :) - Thank you WSW!

The biggest changes this week - we have arms, hands, and sleeves now - thumbs up!


and this lovely lace and pattern around the neck (the necklace is a placeholder for "something gold and complex will go here" ;)
getting the pieces overlapped correctly was "challenging" (oy.)
There will be an additional phase adhering the parts,
gluing the pieces down, and some additional refinements as well.

From the perspective of lying on the floor (whew!)


let's see that face one more time ;)

the hands are a good match - thumbs up!


Sunday, December 13, 2015

too tired for words (but happy!) :)

Too tired for lots of words right now, but I didn't want to deprive you of pictures ;)
Firstly, a big thank you goes out to Women's Studio Workshop


photo by Chelsea Campbell 
photo by Chelsea Campbell - thank you Chelsea!


it started by carving the top small (about 8 x 8" )...
then I it got bigger (a very nice job registering these 6 plates onto one sheet - thumbs up!)

then painting and refinement with ink and color pencils

ahhhhh - a beautiful art-moment


all together now...
but she was lonely...

no worries

that's what flying rats are for ;)
I did get out of the studio a little though

taking in some nature

and I got a Christmas tree for my feline assistants
(good human).

After rubbing her face on it, Jr. quickly brought over her
favorite toy and stationed herself to guard both
toy and tree simultaneously (she is a very clever kitty).

and I baked gingerbread kitties

combining two of my favorites things in to one
fragrant and delectable morsel.

Sunday, December 6, 2015

phase 8 - facilitate a good choice...

still(!) working on this - on the one hand,
 it can be a little impatience-making
when after  3 hours of carving,
I have a 1/4 of a feather to show for it;
on the other hand, they're very big
 (and gorgeous!)  feathers ;)
A very exciting and productive week in Artlandia!  
The wing so far - printed in color and started assembly this week :)
One issue I've been mulling over recently is how to create subtractive prints of large scale things, efficiently and without carving large/unwieldy blocks. One way, is by breaking the thing into sections and carving each section individually (like with the wings).

That works well for things that naturally break down into sections (the sectioning into blocks for the wing reflects the anatomical divisions of the feathers.) But when I tried to make the drapery of the dress the same way in October, it didn't work as well - the results were too fragmented to read as one form. So, this week, I tried something new:
I carved the drapery of the skirt on a full 9 x 12.5" block and printed it. I'm excited with the way this turned out - from across the room, it reads as smoothly as light on drapery folds...but up close, the gouges that make up the form become visible:


Since I ultimately want a life scale figure, I scanned the drapery, printed it using tiling onto 8 sheets of paper, then xeroxed those onto polyester lithography plates. Then I (carefully!) printed 4 plates together on 2 full sheets of Stonehenge paper, and added green acrylic paint.
36" x 24"
The registration was challenging, and even aligning the plates very, very carefully, it left a mark...good thing I'm pretty good at fixing stuff like that ;)
before correction on the left and after on the right:
I decided that she should be wearing boots (I liked seeing the Virgin Mary wearing work boots on the back of the "Coronation of the Virgin" altarpiece by Bartholomaus Bruyn the Elder, ca. 1515 at the Smith College Art Museum this summer.) And, I thought I already had the perfect blocks of my boots in the right position to go along with the drapery (oh, assumptions, assumptions...) I painted the paper, printed them out...then realized they were the mirror image of what I needed (doh!) But! it was the perfect opportunity to try scanning the prints, working with the digital files, and transferring them onto polyester plates and getting a direct comparison between a relief print and a polyester lithography print based on that relief print. Result: It works!  So excited - this process gave me a print of the mirror image of the boot that I feel is equivalent for collaging.

Left: relief print. Right: polyester lithography print based on the relief print

After I reprinted the boots (going the correct direction now - thumbs up!) I cut them out and started refining the prints with color pencil, ink, and paint, and assembling them...

One might not think that little bit of drawing would make such a big difference, but I think it really does - mid-way through refining here  - I started at the bottom and paused between the 2nd and 3rd grommets for a comparison shot. 

Once again, inadvertently dressing to match my work
bringing up the question - do I art like I dress or dress like I art?
Though I have been spending most of my time in the studio, I did get out to enjoy some winter wonderland:


Taking in the local scenery


Sunday, November 29, 2015

phase 8 - facilitate a good choice...

I have died and gone to art-heaven.

A very productive week in Artlandia! 
3 full-sized new plants (!!)
vine black on gray stonehenge paper, 11 x 15":


Maybe I shouldn't admit it, but even I'm surprised to have 3 full-sized plants in one week (gold star!)                                
Mostly this is due to a new technical development (phase 8!) I carved the plants small then used the computer to blow them up and transfer them to polyester lithography plates.  Still a little work to due figuring out how best to refine and prepare the digital files for transfer, but this is fantastic because it allows me to change the size and orientation of relief printed things and to drop out the background to isolate the object.  (Durer may have had an atelier of assistants, but I have a computer, haha ;) ).                                                                                                                        
It also gave me a great opportunity to compare between the relief based plant and the one from last week drawn directly on the plate:       

This is a great example of what I mean by "closed" vs. "open" forms.  They're both polyester lithography prints, but the left is based on a relief print, and the right is drawn directly onto the plate
Looking at these brings up some interesting questions for me. The open style plant is much more in keeping with the style of the 15th and 16th century Northern European  prints that I love (for example, here's a detail from a Durer woodcut). I can make them either way, but...my instinct is to go with the more closed plants (hmmmmmm - time to cut the rope and walk away from the source material?)
the relief plants, 9 x 12" 

I love them in mini-scale, this one is about 3 x 4" 
The plants are exciting in themselves, but beyond that, they've been helpful in testing out the new technique, and now that we know it works...let's raise the bar and try something larger...;)

9 x 12" block
The dress is based on this very beautiful late 15th century
version of 
St. Barbara by Master FVB (pitter patter, pitter, patter).

 I feel like I'm making some real progress, but miles to go...eager to start seeing some larger things come together.