Monday, January 30, 2017

(print) tile project

A busy week in Artlandia - the mission this week was an experiment with the modular tile I'd designed two weeks ago.  This week I carved, printed, scanned, and played with it.  

So the block is a quadrant that's symmetric along the x-y axis (so it can be rotated and line up.) To demonstrate in pictures:
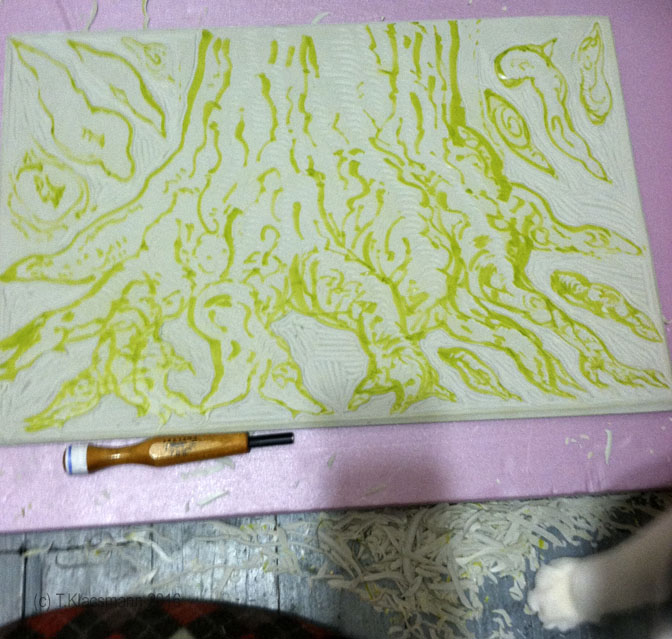
Print of the block:

block rotated and printed 4 times:
  

Printing it multiple times showed me that it worked - it lined up to make a shape in the way I wanted it to, but...the registration on the first experiment wasn't acceptable. While I could think of a few ways to work on/ fix the registration, ultimately I decided that it wasn't the best way to go about it (I'd end up spending a lot of time aligning and printing the block multiple times, and each time through the press is an opportunity for something to go wrong and make the previous times unusable.)  Also, I'm not convinced that it would lead to a better result (for me.)

So...instead, I tried to print it as perfectly as possible once, then scanned that print and used the computer to copy, rotate, and arrange it:

side by side comparison of take 1 and take 2:

Having scanned the print allowed me to line up the parts on the computer, and now I can transfer the result onto a polyester lithography plate and print all 4 quadrants at once - thumbs up.   But that's not the only advantage - I also started to use it as a building block to make patterns:


And that's only the patterns that result from the unmanipulated block - I could also distort the block, for example, by stretching it into a rectangle. and then that could lead to another strain of patterns. So scanning it and using the computer takes a block for 1/4 of a design and helps turn it into myriad patterns.

I haven't printed these with polyester lithography plates yet because (shame face) I'm almost out of toner and plates, and starting to run low on paper (Eep.) I'm not sure how much it matters whether I print each of these - maybe it's enough to know that I could print them? But it brings us to another big thing I did this week, which was apply for a NYFA grant in printmaking and drawing - fingers crossed!!  

Applying for the grant and choosing the pieces for the application gave me a chance to review past work. It was funny because very few of the pieces in the application were from 2016.  I realized that almost all the pieces I included were 30 x 22" (the size of a full sheet of stonehenge paper). It wasn't because I didn't make things during 2016, it's just that I made big elements, like the wings, the Gothic tree, the unicorn, the fox, the figure that I feel like I still have more steps to make them part of cohesive finished pieces. It's like I know how to collage using a full sheet of paper as the support, and I know how to make parts that are bigger than a sheet of paper, but I'm still trying to figure out how to make finished collages that are larger than a full sheet... I'm pretty sure it has to do with changing the support and attachment methods, and I've tried a few things, but streamlining and refining that might be a good overarching mission for this year.  


...which will be interesting, because I'm also continuing to make new things too. This week I also kept working on the Phoenix.  It's slow going, but it's getting closer.


baby steps...

Monday, January 23, 2017

squirrel and tree

A busy week in Artlandia! A new squirrel and 6 feet of art-tree - thumbs up!


To get to that point, first, there was carving and proofing the new squirrel block:

 
Like the rats, I find this little guy so funny for some undefinable reason. Also like the rats, the first block (from July 2014) showed a more static pose, and I feel like I'm progressing toward more complex and expressive postures - thumbs up. Once I was happy with the block, I went ahead and printed this and the older squirrel block on a gray paper and then added ink and acrylic to individualize them.   
new print of squirrel block from July 2014

I also finished the tree trunk block.  Then I prepared paper for it by marbling gray paper with black and then adding green paint for moss so that each print would be subtly different.  I wasn't sure how best to make moss, so eventually, I went with the very straightfoward approach of dipping actual moss in paint and pressing it on the paper. 


  On the one hand, I'm stoked how well it turned out; on the other hand, the amount of time invested into each sheet of paper limited the quantity I was able to prepare and so I did not want to waste any of it.  

Fortunately - no misprints (Whew!)


Combined with the base, that makes
6 feet of art tree so far :). 
  
 One of the cool things about the print is I designed it
so that it can be flipped over and aligned to itself
to act as two 30" segments of trunk.


Monday, January 16, 2017

So many blocks!


A very busy week in Artlandia - working on 5 blocks at once :o (which is not normal for me, and probably not a good idea, but let me explain...)

So...for the first block, I'm continuing on the "seven deadly sins through (faux) consumerist garbage."  This week I made the block for "Acedia" [*fair warning - about to nerd out] - which is usually translated "sloth," but since that's not a commonly used word anymore outside this context, I don't find it that useful as a translation. But! one of the great things about translation, is you can go back to the word in the original language and re-examine it any time.  I'd say it means something more like despair - not having the energy to begin because it's hopeless. (To me, sloth covers the "not having the energy to begin" part, but I think kind of misses the "because it's hopeless," where as despair leans more heavily toward the later part but still incorporates the first part...but neither is perfect.)

...Anyway...so I made a syringe for "Acedia" and that was the first block - I'm especially proud of getting the shine within the tip of the needle and the letters (ooooh the letters.)
Carving Gothic script, backwards, on this scale was definitely "exciting" - oy :P - happy with the way it turned out though - thumbs up!


Next, I've been working on the phoenix block. A close friend requested this, and when I finish the seven deadly sins in individual panels, I've been thinking of making one big tapestry-scale piece with all of them, and doesn't every good garden of Earthly delights need a phoenix?

I was especially inspired by Chinese screens for this, but also (always) Durer and early Northern European blocks.  Still  ways to go on this, but lots of progress, and that was the second block.
Image result for durer wing black and white
black and white of Durer's watercolor,
"Wing of a Blue Roller," 1512:
https://commons.wikimedia.org/
wiki/Albrecht_D%C3%BCrer#/media/
File:Duerer_wing_of_a_blue_roller.jpg


I made the primary feathers striped to keep things interesting ;) - fun times


The third block is a continuation of the tree trunk from last week. Now the I have the base, this week I got new MDF panels and had them cut to 12 x 30" (because 30" is the length of a standard sheet of Stonehenge paper, and close to the maximum length print I can pull from Lucille's 36" press bed.)


Like the base, I free drew this one directly on the block from imagination, and like how it's developing, but there are a loooooot of cuts in this. When I need a break from it and to help me stay motivated, I also started a squirrel (because what's the point of having a tree trunk if I can't put a squirrel on it?) I just started the squirrel (so holding off on photos), but that's the 4th block. 


Image result for 14th century bestiary manuscript
Medieval manuscript depicting animals

For the 5th block, I'm trying an experiment - I want to add repeating patterns onto a solid color background to use behind the animals (I'm thinking particularly of the fox). This is a common feature of Medieval manuscripts (example to the right). To get the most pattern per carving, I'm trying a pattern that can be quartered, so that I can carve 1/4 of it and rotate the block.  I got the pattern by cutting out a snowflake in black paper, scanning it, then printing 1/4 of it on the block as a template.  (This is also early, so no photos until I print it and see if it works :) ), but that is the fifth block.


Whew!  Luckily I've had lots of help from my feline assistants.  They keep me motivated,  going into the studio immediately after breakfast and getting the carving pillow warmed up while Honey and I walk.  There are blocks everywhere, but they've been taking shifts on the pillow while I work.


Monday, January 9, 2017

Zea Mays flat file submission and tree trunk

 A busy week in Artlandia...

I finished the third and final new piece to submit to the Zea Mays flat file , then photographed, filled out the paperwork and shipped them to arrive just in time (thumbs up!)

T. Klacsmann, "Pride," mixed media collage, 30 x 22," 2017


Stoked how well the Superbia cigarette box turned out - it was weird after designing, printing, assembling
this to crush it to make it into "more naturalistic garbage," also, making the faux cigarettes and burning the tips, haha. 


 I also re-photographed "Greed": 
T. Klacsmann, "Greed," mixed media collage, 30 x 22," 2017

That was three big pieces in about 8 days (they mailed January 5th, and 2 of them are dated 2017, haha) so by the time I put everything in the post, I was about ready to collapse and spent a lot of the next day or two sleeping. Then it was time to clean - not surprisingly, the studio was a huge mess after the whirlwind of activity.

In cleaning the studio I took a look at the 'long term goals' board for 2016. While I feel like I did pretty well, there's one part that bothers me - tree. I made the Gothic Tree, which I like very much, but I feel like I haven't quite reached the life-scale I was picturing.  

So...I started, carved, and proofed a new 12 x 18" block.  This was a little atypical for me in that I free drew it directly on the block and went for it. There is no preparatory drawing and no specific source, (though I've photographed tree parts in the conservation area numerous times.)  Since it's not the first (or second, or third ;) ) time I've tried carving a tree, I decided I was ready, and it went surprisingly quickly.    

block with kitty paw for scale.
12 x 18" block


close up of block


proof
 Those individual parts at the sides are roots that are meant to be cut out and arranged around the trunk to show the roots surfacing from the ground. Different arrangements will help the one block be used for different trees, also the print can be cut down along the dark lines in the print to make it smaller, and individual roots can be cut off to further individualize the prints - so far so good, but it's like the wings in that it's a big, multiblock project, so a ways to go.

The feline assistants, helping in the way that only kitties can :p - I got up to pee, and when I came back
there was no pillow or space left for me in front of the block - hard to believe they got that settled in and comfortable within the five or so minutes I was gone, haha. I think I need a third carving pillow.