Monday, March 28, 2016

Unicorns! (...again)

...Not gonna lie, super excited about the unicorn [:) !!]

Now you may be thinking "but didn't you already print a unicorn head?" - I printed a unicorn head, but not this unicorn - haha. This one is the final (*hopefully!) version - it's about 20% larger, on toned paper, and heightened with ink, color pencil and acrylic (thumbs up!)

brand new! 14 x 17" polyester lithography print with added mixed media on toned paper

I sort of want to get straight to the unicorn (because it's literally hot off the press!), but there were a lot of other things that happened first...


For one thing, I kept working on the plant from last week.  I sewed the flowers down with gold thread and think they look nice...but, it seemed like it needed a little something more...

I've been working on cleaning up the yard and getting ready for spring planting, and someone generously donated their cast off losing lottery tickets to my work.
I think this is a little funny because to get the art-ticket to this point I had to smooth out the crumpled ticket, then scan, modify, flip, turn into a plate, ink and run through the press, cut out, hand ink (the gold)... then crumple it back up and put it in the work (haha - from ugly, to beautiful, to ugly, to beautiful...)


During this time, I was also working on the unicorn's neck and tail.  I did a lot of research, before ultimately deciding to draw the neck and tail directly on the block - I tried to make the neck so that the head can be positioned pointing up, down, or straight...


drawing of neck and tail on the block 
 Then I prepared paper for the horn by painting it gold, and the head, neck and tail by toning it (I think the subtle tonal variation is more in keeping with actual hair/fur and makes the finished prints seem more naturalistic.)


I carved the neck, mane and tail block, scanned it and made polyester lithography blocks from it

polyester lithography blocks of the tail and head placed on top of the paper to figure out the layout
I cut the edge of the plates so that they wouldn't
 leave a straight seam...
 to see if that would help make the edges
of the plates less visible in the finished print 
This is the resulting print before any correction -
fingers crossed, I think I'll be able to make that seam disappear...
I did the same thing with the plates for the neck, and will print them this coming week (wish me luck!)
 In addition, I printed the head and the horn and I was so excited about these that I went ahead and took one all the way to completion, cutting it out and adding ink, acrylic and color pencil.


To join it to the neck, I think I'll need to cut it right behind the jaw and ear so that the line between the pieces won't be obvious and I can adjust the direction that the nose points (up like on a carousel horse, or down like on shield, or straight like on a tapestry...so many options ;) )

Other art things..I'm getting ready to carve a 4 x 2 ft block [! :o ! ] I'm extremely excited to participate in a large-scale print event hosted by Big Ink in June. I'll be getting to test out their new, one-of-a-kind, giant, mobile press (which you too can help make a reality!: https://www.kickstarter.com/projects/bigink/big-ink-large-woodcut-revolution ).  This is incredibly exciting, and I'm eager to get going on the block.  It will be the largest single block I've ever carved and it's also a new material to me (MDF). 

Step 1 - obtained the block and got it home [check! It's going well already ;) ]. It's a major time investment, so I spent sometime thinking about what I most want on this block.  

I decided I want a tree - in particular, I want a tree that I can collage my birds into like the tree from the Creation story in the Nuremberg Chronicles (that I'm semi-obsessed with and nerd out about on the blog every few months - like here  O:) ). 
woodblock print illustrating the Fifth Day, from the Nuremberg Chronicle,
by the workshop of Michael Wolgemut, ca. 1493
https://en.wikipedia.org/wiki/Nuremberg_Chronicle#/media/File:Nuremberg_chronicles_-_f_4v.png
I scanned part of one of my collages with a
tree from an earlier block
I thought about carving a giant version of this exact tree, but it's not quite the right proportion for the block; luckily, I've already carved a tree based on the Nuremberg Chronicles that is the right proportion (ok, so maybe it's time to delete the "semi-" from "semi-obsessed"? ).
...now all I have to do is get the tree onto
 the block.[haha :P]
Onward!

Monday, March 21, 2016

spring flowers

Happy first day of spring! What better way to celebrate than with art flowers? :)

I tried something new, and printed shaped polyester lithography plates in white on black paper and added the flowers printed in a brownish-gold on pink marbled paper.
polyester lithography plates on black stonehenge paper, 15 x 22"

First, I drew these patterns and transferred them onto plates:


These are a type of pen drawing that I do sometimes just to relax and practice hand control, but I thought they could work as polyester lithography plates, so I made these this week, then scanned them and transferred them onto plates.

After the trial installation, I've been thinking that I'd like some type of patterning as a ground that can be joined in segments like a stained glass window. I remember looking closely at grisaille with silver stain patterns and plants in a stained glass window (but despite scouring the internet and my photo archives, I couldn't find a picture corresponding to the memory...and since I can't remember the rest of the window - it's main subject or where I saw it (though I think it may have been at the Ely Cathedral Stained Glass Museum?); I couldn't find a photo, but luckily, I remember that one small section pretty well, and wanted to try something similar using these patterns as landscape.  

I cut the edge of the plates into a grass pattern, inked it in white, printed, then printed the plant on top of it.  I printed the flowers separately in gold on pink paper that I'd marbled earlier in the week. I like the way it turned out, but this go round, I was only able to get one print - the first try, I didn't have the ink quite right ( - the first time I've tried anything except black with the polyester plates :) ). On this one, the plant plate tore (badly - oops). It's an interesting start - I like the way it looks (thumbs up!), but still a few technical challenges to work through on a small scale before trying to expand it into room-scale...

In para-art news, I found an owl cookie cutter and made my first batch of shortbread owls (yum :) )


Spring also means spring cleaning and repairs, and I've been working in the yard, clearing things out and getting very excited for spring planting (soon!!). In the studio I've been organizing and letting things go - one of the best "fixes" of the week - this bookcase...
Just No.
....better


Sunday, March 13, 2016

Installation time :)

Whew!


The final results of VCCA residency 2016 :)
Raphael, Justice from the Stanza della Segnatura, 1509 - 1511
http://www.wikiart.org/en/raphael/justice-from-the-stanza-della-segnatura-1511

Yay for installation! But before I installed, I carved this block - a replacement for the figure's right hand. (The first hand was just a stand in until I had a chance to carve this new one in the position I was picturing.) Carving hands is tricky, and this pose was challenging because of the twist in the wrist and the way both the back and inside of the hand are showing. The pose is similar to Justice's left hand in Raphael's version in the Vatican (but with my knobby, bent fingers ;) )


...and here it is joined to the rest of the figure and holding a unicorn chain.
Some detail shots of the installation:

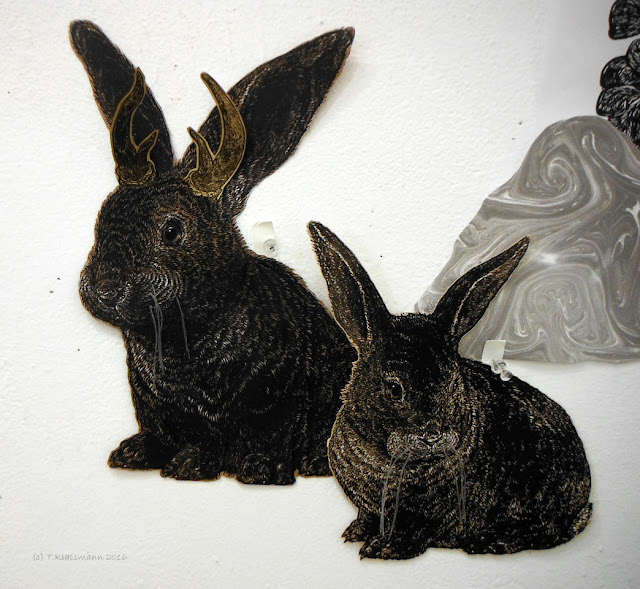
I sewed on the bunnies wiskers, but didn't have starch with me, so I'll get to starch and re-iron them
at home (ah, an artists work is ever done, haha.)

I also collaged in the golden horns  (on the male, I don't think female jackalopes have horns?)


Much work to be done still - re-carving the legs so that they match the body better and increasing the
size of the head, but still exciting to see the machette and get an approximation of how it might look.
The plants turned out gorgeous, and I think they're going to look great, but still refining how to
place them into the landscape (hmmmmmmm.)
The marbled sections turned out well, and I'd like to add additional segments onto them so that they aren't so isolated from one another but still small enough for me to de-assemble, pack and transport myself. 
The shaft of the column is just a place holder of
toned paper for now, but I like the way it works as a
perch.
I turned the flying rats into a mobile -
which I love because they really bob and flutter...
but - now they have a visible back (oops) -
still figuring out exactly how I want to resolve that...


Me, playing dead-tired for scale
It's exciting to see it starting to come together, and it was a wonderful, productive residency in a large beautiful studio surrounded by lots of hardworking and talented people - thank you VCCA!

Now, I'm pretty wiped out, and if I think about how much work there is still to be done on this, it makes me want to cry; so instead, I'm trying to focus on how far it's come - Fortituuuude!...baby steps.

I got to experience both winter and early spring in Virginia, and I'm excited to bid winter farewell and start to clear out the garden for new flowers.


I enjoyed traveling, visiting with dear friends and getting lots of work done...but, naturally, I also missed my feline assistants. We've been joyfully reunited, and they had such loving care while I was away that they weren't even mad at me when I got home.  

However...despite my effort to reinforce across the span of their entire kitty lives the message: "Kitties don't go on the kitchen counter," it seems that during the 2 weeks of my absence, that lesson was quickly jettisoned, and I came home to a clear statement of "Look Primary Human, we go on the counter now!" [doh!]

I'm also especially proud of Jr.'s beautiful coat (they are both currently at maximum fluff - one of my favorite things about winter :p)  My elegant Princess has downy soft fur and a luxurious mane that she really grew into between the time she was about 2 and 4 years old.  I'd been waiting to see if Jr. too has a fluffy coat (I know her Mom carried the recessive long-hair gene). This winter, she has silky long fur on her belly especially and a much thicker ruff - My little kitty is growing up, and she's a beauty just like her big sister - so proud!

Sunday, March 6, 2016

Unicorns!

A beautiful week full of unicorns!


So stoked about this - I heart unicorns! My undergrad thesis project was creating a faux natural history exhibit on unicorns, and I'm still interested in them as fictional creatures whose role in myth and history is very real.  

Evidence! from one of my favorite 15th century manuscripts, the Ortus (Hortus) Sanitatis, ca. 1485-1491.   
Monceron,”Ortus Sanitatis, woodcut,
Mainz: Jacob Meydenbach, 23 June 1491
Albert E. Lownes Collection of Significant Books in the History of Science, 
John Hay Library, Brown University, http://library.brown.edu/create/unicornfound/monoceron-unicornus-and-rinocephalus/
Okapi
While I drew on Durer's The Small Horse  for the unicorn's body last week, this week I wanted to focus on the head (and the horn - at last!)). In keeping with the portrayal in the Ortus Sanitatis, I was going for a less horse-y face. I decided to merge the skeletal features of a horse, with those of an okapi  (ahhh, okapis - such beautiful, gentle creatures.) Scholar Chris Lavers in his book The Natural History of Unicorns proposes okapis as a candidate species the stories of which may have inspired and/or fed into the myth of the unicorn - awesome :)!

  *Fun factoid - okapis have long black tongues. For some reason, I find this very funny - imagining my unicorn with a startling, black tongue.                                                                          
So early in the week, I focused on carving the head.
9 x 12," linocut, on gray paper with added white and gold ink
 Not gonna lie - I really like this one :)  - but...

Holding it up to the maquette of the body...
This body is too big....

This body is too small...
And yet the head is just right...

(Reluctant) conclusion? While I tried to convince myself otherwise ("Oh, but the final version will be much more unified - it will all be one media [polyester lithography plates], and it will all be on the same toned grey paper, and I'll have an additional layer of added black and white paint to help unify it," etc.)

And that's all very logical, and true, but the (art) answer is still no, just no. [sigh. ;)]

...So, I carved a new block for the body

The issue is not only the scale, (which could be manipulated without carving new blocks), but that the the character of the marks doesn't match closely enough - there's not enough detail in the body for it to read as having the same texture at the head.  I think the below comparison does a good job showing what I mean - the top image is the shoulder in the blown up version of the first block, the bottom image is the shoulder of the new version I carved this week.  The first go round, I was mostly focusing on getting the correct anatomy, the light on the musculature, and the directionality and variation in size of the marks. The second time around, I tried to hold onto all those things and add more detail including the texture of the fur (- I decided that unicorn fur is slightly shaggier than normal horse fur, more like a Shetland pony :)).


In short, I re-carved the body this week: version 2

9 x 12," linocut
The size of my relief blocks is fixed (9 x 12"), so in order to include a wider variety of marks, one solution was to divide the body up into more sections so that each part can be carved larger. This is a little trickier than just adding more blocks though because I also want to be conscientious of the way the resolution changes.  In a sense, I added another layer to the change in resolution so that it expands outward by degrees - instead of going from A (the body - blown up) to B (the head - 1:1), now I'll go from A (the body - blown up) to B (the neck and legs - blown up less) to C (the head and feet- only blown up a very little or not at all). This way, the change in resolution from the core of the body to the extremities happens more gradually, by degrees. The more gradual transition, I think, will help the whole creature read as a unified form (fingers crossed - we'll see ;)). Time for a diagram!


13" L


Then, at long last, I carved the horn, based on a narwhal tusk.


It was very satisfying collaging the horn on.

the horn and head collaged together for the first time. 
studio shot, including my small heard of horse models and the grassy carving pillow

wall view of the various unicorn parts
Lots (and lots) of carving going on this week, but a few other art activities as well.  I studied for (and passed!) my photoshop final (whoop! - thought I'd use some of my new skills to test out potential wall colors with that lovely celadon background in the unicorn photo :))  In addition, I applied for a workshop to study the care and digitization of Medieval manuscripts - fingers crossed there will be some real life handling of 15th century manuscripts in my future!(:o !)


 And last, but not least, outside time! Spring is just around the corner.