Monday, September 28, 2015

phase 8 - make the right choice easy(er), ongoing

A busy week in Artlandia - getting right down to business - the 5 blocks/plates a week mini-project continues with pieces #11 - 15:

block #11
"life-scale," an  inverse of a block from  a month ago -
 I think it went better the second time around,
and a very good likeness, if i do say so myself ;)
 Work also continues on the tiny tarot, but in a new way...
block #12
block #13
It took a few tries to figure out how to go
from plate to block, but on the 8th try - success!(The others wiped off with soap and water,
 so no block material went to waste - thumbs up!)


I took the existing aluminum plates and (after some trial and error) printed them into a block and carved them. Part of my reason for doing this is that I have come to the realization (/accepted) that  right now, the editions from the aluminum plates are going to be very small ...but if I carve the images into a single relief block, I can more easily print them and have more... 

I can't take credit for this idea. Printing cards in a sheet follows phase 8 and making the right choice easier as well as trying to build it like what it is - I'm inspired by 15th and 16th century Northern European woodcuts, so I used that as the model. Playing cards and saints cards (like this one in the National Gallery ) were printed in sheets back in the day (probably for the exact same reasons - relief prints are much faster, easier, (and therefore less expensive) to print than intaglio and putting them in a sheet gives a higher yield per impression.)  Then I cut them out afterwards...
Next, I made this mini-block for #14. It's very similar to one of the first blocks I ever carved. (The tree in that one had always bothered me, and I thought I could to it better now with better tools and more practice :) - true.)
Block #14
 The tiny house block was put to immediate use in the next Fledermaus collage, that I started this week. Still in process on this - arranging and re-arrange and re-rearranging the elements...

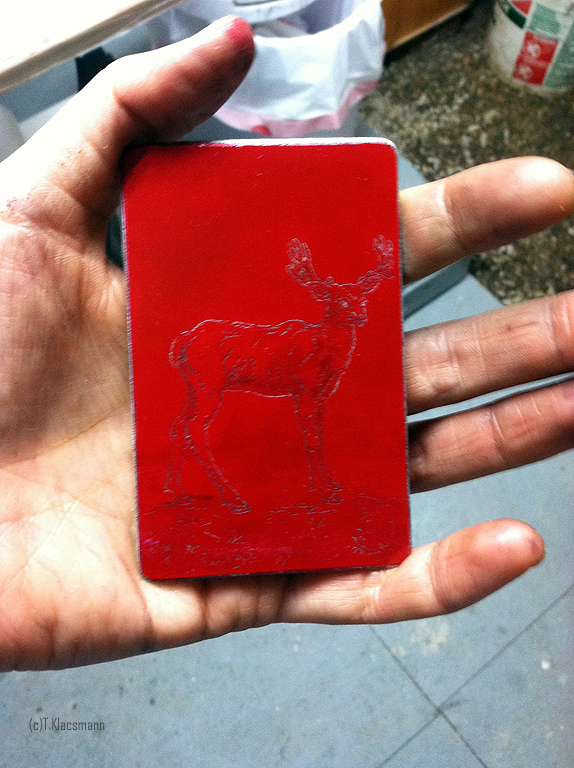
#15 is the only aluminum plate this week.

plate #15 - 3.5 x 2.25" 

It's not part of the tiny tarot, but I just (seemingly randomly) really wanted to make a deer. Since there was plenty of time to dwell on this while working on it, I started to get a little worried: "am I bored with the tiny tarot? (that would be bad, since I'm only about half way through the deck)...maybe just not connecting with the remaining cards? (sort of true, but I can always choose/tweak the iconography...) Why the deer now??" I photograph deer frequently and they appear in my work sometimes (like the Tower in tribute to Master of the Playing Cards). Moreover, there is a technical reason for wanting to try this plate - the tiny tarot cards are done in a single grounding (*and to keep them an even set, I don't plan to change that), but with this plate I tried re-grounding the plate for a second round of working into the plate as a soft ground, baking it, working more into the hard ground, then spit etching; so it was more processes than I would have used on a tiny tarot plate.

working into the plate as a soft ground
plate re-grounded with B.I.G. ground
(* I know, I sound like a broken record, but
this stuff really is (green-)magical)

after a little more work on the hard ground,
I spit etched and selectively polished the plate
(which doesn't show up very well in my not-so-good proofs,
though it's just enough for me to tell that it's truly in the plate.
A bit frustrating knowing that there's more information in the
 plate than is showing up right now. Though better this week than
last week - bevelling the top edge down further
 did help the plate to go through the proofing press (sort of)...
 how happy-making it will be when I print these
 at Zea Mays in a few weeks...) 
As I was working on the next piece
(back to the tiny tarot!), I looked up
and had to laugh at myself
 - this is the view about a foot from my face,
just above eye level when I sit at the desk
to work under magnification...
- the model was for the deer that was
part of Eros et Thanatos in Nov. 2013
(which  did come to mind...) even though,
somehow, I didn't realize until I was finished
that this model has been inches from my face
  
for hours while I've been working on the
tiny tarot, hahaha.

.  


 The technical reason is true and valid, but it felt like a narrative "fill in the gap." (after all - it could have been anything), but I figured it was just one of those things - sometimes you just feel like making a deer (shrug)... I moved on to the next plate...and then looked up - at the deer which has been inches from my face the entire time (and just happens to be in almost the exact same pose, hahaha - silly human).

Other art activities of the week - I went to Print Fair North at Zea Mays, and it was awesome! I really love seeing the work of so many talented and dedicated artists all in one (familiar!) place.  I charged the camera battery, went back in the house to get my camera when I forgot it, then was so art-happy that I forgot to take the camera out of my bag [doh! sigh.] Fortunately, there's a nice article with pictures in Take Magazine this week - can you spot me? :) ).

In para-art news:
crossing paths with more orange industrial things
on the streets of Hudson - yay!
Officially fall and the first batch of
pumpkin spice cookies


Requisite eclipse shot 

because I included a cute kitty photo of my princess
last week, this week I figured it's Junior's turn -
here we are in the studio, working hard,-
worn out from a busy day of hoarding winged rats
and playing with the collage thread, she has
decided to nap on Mom's lap:
 "O, you didn't think you needed
that hand to cut out and arrange paper did you?"


Monday, September 21, 2015

phase 8 - make the right choice easy(er), more more

A busy week in Artlandia!

Work continued on the 5 blocks a week mini-project, but first...

I don't regret trying to squeeze in a mini-project, but one reason I was initially hesitant is that it's not the only iron in the fire right now. I love mini-projects, but also want to make sure to follow through with other commitments...so, the first things I did this week weren't mini-project related, but more fledermaus(es) [ or "fledermice" ? :p ] - Preparing for the upcoming exhibition En Masse II  at Thompson Giroux Gallery later this fall:


Fledermaus 2 and 3, 12 x 12," collage on marbled paper 

 Though maybe not entirely disconnected from the mini-project, because I used the digger block from last week and reprinted the flowers with a more transparent ink.

This think this shot with the non-transparent ink in the center left and
transparent ink on the right side does a great job to showing the difference
between the two - I find the flowers printed in the more transparent a much better
density for collage (the earlier ones always felt too heavy to me) - thumbs up!

One aspect that I'm especially proud of with these is the trompe l'oeil effect in the background that I used to merge the pieces - the stems of the flowers are printed on a mustard color paper, and I used watercolor and ink to match the negative spaces with the surrounding green marbled paper (and a picture is worth a 1000 words on this as well...)

with a paper behind to show the division between the pieces
On the one hand, the elements coordinate well (and I think that's part of what makes the piece feel sort of uncanny); on the other hand, success at this is measure by how invisible the technique is, by how easily it can be screened off, so in a sense it feels a little like a pyrrhic victory - I'm getting so good at erasing myself! [- haha] I enjoy these, but at the same time worry that they read as just some funny little things I put together - that the light tone an bright colors may make the thought and skill that goes into them too easy to overlook/discount [hmmmm...will have to think more on this....].

Onward to the mini-project! Blocks/Plates #6 - 10

plate #6 - the Fool 

#7 - Justice 
a view of the plate - printing these  didn't go as smoothly as one might like
(my first time using these plates, which are slightly thicker than the earlier tiny tarot plates
 - will need to bevel down the front edge further on the next round of plates).
This just highlighted for me the fact that the aspect I most enjoy isn't the prints, but the metal itself.
Not sure what it is, but I polished and burnished different areas, and there's
something so satisfying about the differing levels of shininess :)  
In terms of phase 8 - make the right choice easy(er), I knew it was going to be an art-challenging week to try to make 5 new blocks/plates in addition to the fledermice (...and a residency application, and an exhibition proposal - eep!) I decided that the easiest plates to attempt would be the Fool and Justice for the tiny tarot this week. Because I'd done the research and prep work for similar pieces in copper on a larger scale in July, it felt like I had a head start.

For blocks #8 and 9 I tried another multi block repeating pattern:

blocks #8 and 9 


Workshop of Master of the Cologne Arms
German 15th Century
Master of the Cologne Arms
German, active c. 1470/1480
in the collection of the National Gallery of Art, Washington D.C.
The pattern is based on the type of patterns seen in Byzantine textiles (which made their way into Italian and Northern European prints as well - to the left is a good example of the use of repeating patterns in Northern European block prints)  

 I made it modular so that I could change out the content of the roundel,  and I made some modifications to the pattern to account for the change in material- adding the small notches around the roundel both help equalize the pressure on the block so that it will print clearly and help me register the roundel.  

The circular symbol is the "biohazard" sign - attempting to use an old technique/form in a way that is relevant to the present.

Here is what it looks like in the proof all together: (This is 24 rounds of printing - 9 for the square and 15 of the roundels - O my :o ) 

8.5 x 11" - blocks #8 and 9
By the time I got to block #10, the week was drawing to a close.  It was (very) tempting to do a less ambitious block, but I really wouldn't want to use the quantitative aspect of the project as an excuse to avoid making the blocks I most need. And the block I most needed was going to be a challenge now or later.

The main focus of last week's trip to the Cloisters was studying/ photographing drapery folds on a raised right arm. The research was there, the tools were ready, the block was prepared. Of course, none of the views I photographed were exactly what I was looking for, and I started to get caught up trying to figure out what would be the best way to merge and transfer the views. Ultimately, I decided that the best "tool" for merging different views and filling in the gaps with something plausible to make up a new image - is the human mind, haha.  I ended up not transferring anything and just drawing directly on the block: 

...and this was the moment when I realized it was going to be the
wrong sleeve (doh!), but then I decided "I really wanted to
carve a mirror image of the hand and reverse the gesture."
(this is actually true - I had been considering rearranging the composition,
but this  made that decision easier ;) )
drawing on block - not the prettiest,
but very functional


proof of block #10, 8.5 x 11," I think it turned out pretty well - a good first attempt [thumbs up! :) ]
Para-art activity was somewhat limited this week (something had to give to get that last block made ;) ) - but there are always (always) cute kitty moments - like when Feline Assistant #1 used the step ladder Mom left out to paint the walls to jump to the top shelf. I heard her bell and knew she was in the room, but didn't see her right away...until I looked up just in time to save the bird mobile from becoming a kitty toy (and take a photo, haha). Also, time spent in the conservation area - I'm usually pretty good at spotting creatures, but now that the leaves are starting to fall I almost missed this little frog.


Monday, September 14, 2015

phase 8 - make the right choice easy(er) - more


A busy week in Artlandia!

I especially liked seeing it installed peeking through the crowd.
I almost don't know where to start. First, bringing to completion 2 pieces with openings in New York and Hudson:


While in New York, I paid a visit to the Cloisters ( :o !!!!!!)

I saw so so so many Medieval art goodies, that I can barely restrain myself - but here are a few of the highlights:

Grisaille stained glass heightened with silver nitrate


Mmmmm - aedicules


tiny sculptural aedicules
A St. Michael with
black and gold armor is one of my
favorite things

and it get's even better! -
detail of the floor
more patterning
I really, really like tiny metal things....
intaglio gem with lions

basse-taille enamel!(!!)


and when they show mythical creatures with patterning! 


Ivory - with falconry!
pitter patter, pitter patter, pitter patter!

Needless to say, I had an extremely fun time - happy tears of overwhelming-art-joy were shed!

It was hard to stay focused amidst so many mini-Medieval 
art- marvels, but I did have a (very) particular art-mission - to see examples of how Medieval-style drapery responds to a raised right arm: 


And, of course, I couldn't help myself from photographing creatures in the park on the way to and from the museum (these city dwellers seem so used to humans that they let me get really close.).


But it wasn't all research - also plenty of do/make going on.  I'll be participating in the upcoming exhibition Fresh Ink as part of Print Fair North at Zea Mays in North Hampton beginning Sept 26th.

I decided I wanted to make something new for it (Why, oh why!)
"Fledermaus," 12 x 12," mixed media collage, 2015  
Even though one might wonder why start from scratch on this - after printing the others, I had a new idea that I wanted to try out- it occurred to me that if I printed in a more transparent black, it would leave me more room to add emphasis by hand, so I tried it:

for comparison - on the left, printed in semi-transparent black with drawing for emphasis; on the right printed in black 
As much as it was a pretty hard push to complete this, I think the semi-transparent ink worked well (thumbs up!)

And there's more...(more!?!)

So, even though there was a lot going on this week, one thought kept coming back  - the year is ending, and it's there first in a long time that I haven't done a "quantitative" type project. Summer is really the only time I have enough energy for that type of project, and I can feel the window of opportunity closing. I really tried to let it go: "but I did some other important things with that time...I can try again next year..." etc.  None of that was as convincing as the thought: "Well, today is Wednesday...there's still time ;)."  On the one hand, I usually [never] start projects mid-week, on the other hand - good thing I'm the captain of this art-ship, and can divide 7 by 2 ;). 

In terms of phase 8, I think one way of making a decision easier is to set up a framework and follow it - turning lots of small decisions into a few bigger ones - so here it goes - going for it - a new mini-mission:

4 weeks: Sept  -7 Oct. 7; 20 blocks/ plates (averaging to 5 a week with 3 the first half week and 2 the last half week).

The purpose of the project is to practice and integrate the new intaglio technique and see how it complements relief, so I'm not restricting the type of plate.

There are a few ongoing projects/ applications that also are needing attention, so in an effort to stay focused, I'm not going to worry about pulling final prints right now; instead, I scheduled time at Zea Mays on the last day of the project to try to print them all at once (and I also hope that by then I may feel ready to prepare some larger plates?)

Work started immediately:

The first 3 blocks are something new I've been wanting to try - I carved a block that can be printed multiple times to make a repeating pattern. I cut the block into a shape so that the borders of the block indicate the registration (since this is one area in which I need all the help I can get - trying to make the block do most of the heavy lifting on this.)

I think it may have actually worked...
8 x 25" 
proof of mini project #1


Once I had the background pattern, I wanted
to try to make it more specific...
One  thing I love (love) to photograph is construction 
machinery (here's some nice ones from this past week):


So...I decided they'd look great incorporated into the pattern (but I wanted to keep them as separate blocks to keep the pattern versatile).   

One of the reasons for doing a quantitative project is that it pushes one to develop efficient methods. [cough, cough - masochism - cough cough]  I tried something new with blocks 2 and 3 too:

I wanted to keep the registration as easy as possible, so I cut the blocks to match the shape of the pattern, and for the source material, instead of trying to figure out (or guess) what size and direction to make the machines, I just printed a few on translucent paper - held them up to the block and picked one, then flipped the sheet over for the drawing (thumbs up).
proof of block #2


proof of block #3     


blocks all together


In Para-art news:
prepared plates for next week :)


...but I heart flowers too
I like seeing the cityscape