Sunday, July 31, 2016

Paper making adventure!

A very special week in Artlandia! I learned how to make paper! ( :D!!) Thanks to a scholarship from Women's Studio Workshop :), I learned how to make translucent paper from the awesome Sarah Bertrand-Hamel (check out the description: http://www.wsworkshop.org/event/color-in-paper-sarah-bertrand-hamel/ ).

I heart stained glass (throwback all the way to my student days with this faux stained glass piece that I made in 2009 and blogged about in 2014  - funny how my interests haven't changed that much - unicorn, bird, figure, patterns, and a red - blue - green color scheme.) I enjoyed these, but they weren't super stable, and I was drawing on engravers ornament and woodcuts for the patterns and designs without knowing much about them. I didn't forget, but it's been a long path learning about each element. If I were to make something similar now, I like to think I'd do it better...
I felt like a witch stirring brew while mixing
these big vats of color pulp
Learning how to make translucent paper was very exciting and a step in the right direction. While I have experience with techniques for modifying paper, through marbling and making paste paper, I'd never made paper from scratch before.  We started at the beginning beating and mixing pulp.
I wanted to embed black tracery like elements in the paper, so I cut out shapes (like black paper snowflakes), then placed them in the pulp with some methyl cellulose on them to be extra sure they'd bond with the pulp


cutouts on the interfacing
cutouts with wet pulp over them
paper with cutouts drying


After testing it on small sheets, I went for a big sheet and added
 color pulp in select areas with a syringe

:D !
 I also made lots and lots of plain color sheets. I haven't decided exactly how to use them yet, but I'm excited to work them into collages [thumbs up!]
 

I also continued work on the life-scale fox.  I scanned the small fox from last week and transferred it onto polyester plates.  I could have printed these onto paper and called it a day, but instead I transferred them onto an MDF block to carve at scale (the tail will be a separate block, like the head). I want to try this because if I were to attempts, say, a horse, I'm trying to figure out how best to go about it...
Polyester plates on top of the block with Jr. helpfully establishing scale.
polyester plates printed on the block - the photos also show how the head could be printed in mirror image to have a fox turning in addition to looking forward.

Garden update:

blackberry harvest
favorite flowers of the week!

and a particularly good and colorful batch of rainbow cookies this week
(inspired by the flowers and rainbow color pulp :) ).


Sunday, July 24, 2016

Big Fox, Little Fox

Little Fox, Big Fox
A busy week in Artlandia!  

I finished and printed the little fox from last week (thumbs up!)  I have big plans/ schemes for this block - I'm going to try combining two of my processes [steeples fingers].

 Looking back and evaluating blocks, two of my favorites, are the full scale head and hands from a year ago.  To make these, I carved them small first, then printed and scanned, blew them up, transferred to a new block, then recarved to scale.  

Sort of complicated (true.), but I think the multi stage process works well because in the first round, I can see the object as a whole and make the decisions about the light and dark, and in the second round, I can focus on refining the details. So I tried that with the foxes here and carved a life-scale block of the fox head this week.

Life-scale fox head from this week - app. 9 x 10"
The next part, will be like a process I used with the raptors, another favorite.  There I used multiple blocks for different sections of the body (this has the advantage that I can easily switch out the heads like an art-Princess Momby.)

The difference here will be a material change - instead of using the soft carve sheets that I used for the raptors and the fox head, which comes in 9 x 12" sheets.  I'll blow up the small fox, print it on polyester lithography plates, and transfer it onto a piece of MDF to carve (the same material I used for the Gothic Tree).  It's a hard and slower-carving material, but it's economical and readily available in large sizes.

Speaking of the Gothic Tree...I got one of the prints up on the wall in the studio and tried my first digital collage from the scan of the branches :D  One of the awesome things about the digital collages is that they can be made any size, so I made one version of this one to fit a specific unusually sized frame.


first digital collage from the Gothic Tree scan!
Other art activities - I'm still working on the life-scale figure [doh.] I keep adding details, like the ring and the gold beads in the center of the flower which are sewn on and knotted after each one [double-doh.]

Fortituuuuuuuude!


In para-art news, I got to see an Amanda Palmer concert!(!) I wanted to go, but crowds in general make me nervous, and I'd be going alone, so I dragged my feet on buying a ticket. Then, the afternoon of the concert, when I realized I could get a ticket for the price of 3 fancy cups of coffee and walk to the venue (the lovely Basilica Hudson), I knew I'd kick myself if I didn't go. So I did. (Great story, right?! :p) Two Thumbs Up! 

No puppy photo this week, but the nature shots are indirectly puppy-related.  I have aussenwelt photos from this week, for the first time in a little while, because Honey is learning to sit and wait nicely while her human puts that little box over its eye and gets all excited - such a good, patient pup! 


Not my best composition, but no color correction on this - weird right?!
 Last, but not least, the flowers of the week!

Sunday, July 17, 2016

Tree and Fox

A busy week in Artlandia! 

I tried something fun with the Gothic Tree - I brought it to a nice copy shop to have the whole thing scanned on a rolling scanner (one that can take a piece of paper up to 36" wide - this print, 35.5" ;) )

The result was a scan of the whole thing at 600 dpi (!!!) - this is awesome, because it means there's enough detail that I can make the image even bigger and transfer it onto polyester plates.  Because it's one scan and one file, I can divide it into sections and be sure that the parts will fit back together again at the end (key, that ;) ).

I started testing it out, focusing on a cropped view spread across 3 plates.  I then both added and subtracted elements by drawing on and cutting the plates.

Next stage will be printing (more to come!)
testing out increasing the size of the tree and transferring it to polyester plates


I also started carving a fox. I think I have an idea for this...still thinking [hmmmmm.]

 Garden News!

blackberries are doing well - must resist as the ripen
 [steeples fingers - soon.]

These are some of my favorites - they look black in the fall
(which I also like), but in the summer, they're an
 unusual oxblood.
Looks like I may finally have found the right spot for the moss roses (and Honey seems to like them too :) )

 Puppy update!

Stage 1: "Why, thank you, Human, for this lovely giant water dish."
Stage 2: "Ohhhhhhhhh, gotcha!"
Family unity! Now if only my Princess would join us - she's doing well,  but still isn't so sure about napping too close to "the little beast" (Honey :P ).

Monday, July 11, 2016

The Lorikeets and the Gothic Tree

Put birds in it.

A very busy week in Artlandia!  First off - lorikeets. 

So...I had been thinking (uh oh.)...usually, when I marble paper, I only use one color or one family of  related colors and then black and/or white, but for these, I wanted sections of different colors, and I wanted them in specific places, and I wanted to be able to repeat the placement on multiple sheets [ - and, and, and -  ;)].  I didn't think the Suminagashi style of marbling that I usually use, where the colors sit on the surface of water, was best suited to this, so I decided to try something different. 


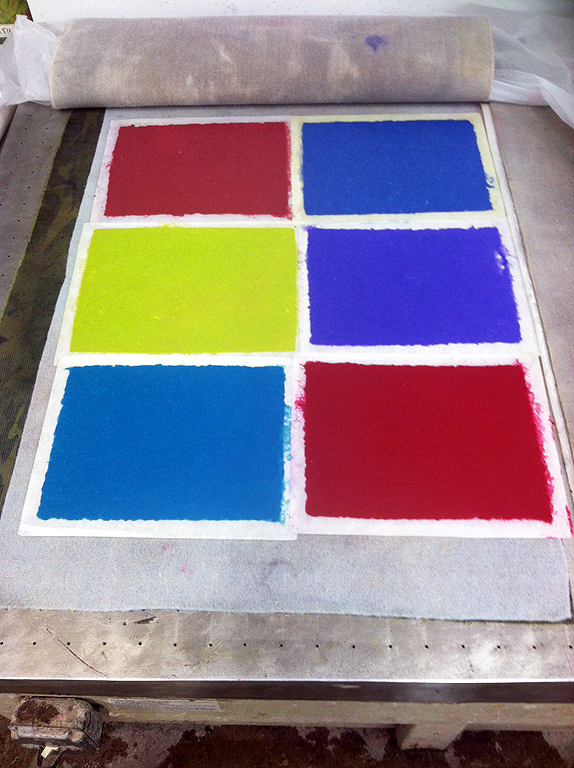
I made monotypes by rolling up a gelli plate with actylic medium, then adding and manipulating the colors, then spritzing it with water before putting on the paper...

colors pushed with a clay tool  in medium
 before adding water


resulting paper - thumbs up, and an added bonus, the gold showed
up well 


Still exploring and streamline the process, but overall, I think it worked well and the results were what I was looking for.

Then, I scanned the block and worked with it in photoshop and printed it onto a polyester lithography plate.  I made it just a little smaller and changed the position of the head a little bit so that they look like different birds and not straightforward mirror images.


I decided that I would only use them together if I could get the polyester plate to match the relief print in quality to the point that the difference in technique is undetectable when comparing the two side by side.

(*This is an important issue to me right now because, if I can get them to match well enough, then I can use this process to make the second in a pair of the large scale wings. If not, then I'll carve the other one...and since the first one took 6 months to carve...I'm pretty motivated to try to make this process work O:) ).


The verdict: success! Holding them right up against one another, they're a match - the difference in technique is practically undetectable. (Yay!!!!) Though still some kinks to work out - there were misprints with the lithograpy plate, only about half of them were crisp and even enough to match the relief prints (there were no misprints of the relief block). With the work that went in to monotyping the paper, any misprints are a bummer, so still some work to be done refining the printing process so that the polyester plates print well consistently. Still - it worked!

8 good ones

 Then, the second big project of the week - proofing the Gothic Tree block!(!!!)

2 x 4 ft tree block!
I was super excited to be there printing at the public debut of Big Ink's new, custom built, giant press, and not only is it giant...it's mobile! So cool.

It was fun meeting other artists working in relief, hearing about everyone's process, and seeing the unique blocks and prints that resulted.


Moment of truth when the print came off the block :D! 
drying - such a smart way of hanging these up to dry 
I didn't get too many pictures during the printing (hands all
inky and occupied, but here I am very, very happy (and inky)
with the proof, which will become part of the Big Ink archive.)


In garden news, my favorite flowers this week are the red roses - I think I may have fed them just right this time, and they're doing well :).


I also planted some new zinnias...and somehow, so far, they're all pink (! - noooooooo), and the new rose that was supposed to be red...also looking distinctly pink (eep!)